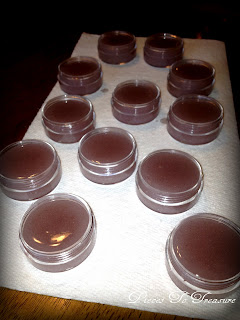
This month is my daughter's birthday. She'll be 9 in less than 2 weeks. Unfortunately a large event falls on her birthday this year so we're doing a special make over/sleep over the weekend before. So in preparation of the party I made up some little treasures for each of the girls.
Ok, I told you all I love to find ideas and copy them...normally with my own spin, but this time it's a direct copy. So, to be proper and give credit where credit is due I'm going to tell you this was totally Jill at Meet the Dubiens blog. She had such a great idea, and it's so simple that there's just really no changing it up. Other than our labels, the rest is exactly the same...but I'm a tutorial type of girl so I'm going to include one here.
The Pieces:
Vaseline
Koolaid
Cocoa
Sugar
Labels
Containers
Glass Measuring Bowl
Rubber Scraper
Whisk
Computer
I found my small containers at Michael's in the bead department. I wanted to buy them locally and this was the first place I found them. They're entirely clear which is cool to see the whole thing, but I also bought clear labels...hmmm, hard to see, but we're talking about young girls here and they just don't care. The container included 24 little pieces in a box and was $9.99. With a coupon I got an awesome deal!!!
I got the labels at Office Depot and it was an Office Depot brand. From reading Jill's blog and comments I heard that several people had to cut down the labels. I didn't want to have to do that and I found 1" ones, which fit perfectly. I used my Publisher and Word programs to make up two different labels...one for Cherry and one for Chocolate. I had to get the template for the labels off the Avery web site because it wasn't in my Word templates. I couldn't use the template in Publisher (which would be my preferred method for things like this), so I had to edit the picture and text in Publisher then copy and paste it in Word. (Why can't they all just do the same basic stuff...it would make it much simpler?!?!?) I test printed them, then put these little things through the printer. It worked perfectly...which is a victory in and of itself!!!
Once the labels were done I adhered them to the containers before putting any Vaseline into them. I didn't want to take the chance of getting a greasy film on the lids and the label not adhering.
 |
| I loved the way the flash refracted through all the little containers!!! |
A Few Quick Tips: When you stir between microwaving, I suggest making sure the liquid around the sides gets incorporated well into the more solid mass in the middle. You'll see what I mean when you're doing it. Also, I stopped heating it as soon as it was liquid enough. I have learned from heating chocolate to stop short of being completely melted vs. overheating. I decided it would probably be best with this as well. From posts I've read on Jill's blog some people struggled with the Koolaid not mixing in to the Vaseline well. I didn't have that problem, although as you'll see in a bit, you can still see tiny dots of the Koolaid in the cherry batch, but it stirred in very well without clumping.
Moving on...for our first batch we made the cocoa. I added about 2 tablespoons of cocoa and about a tablespoon of sugar. (These were not precise, and I could have added more sugar because we couldn't taste it at all. I just wanted a hint of sweet...next time!) I started stirring with the rubber spatula, but ended with the whisk. It came out smooth and beautiful. I had my daughter lay out the 12 chocolate containers and while it was still in the liquid state I filled them all...leaving a bit of space because I didn't know how far the batch would go. Once I filled them all I tried to go back and fill more, but it was already starting to set up so it looked bad. I stopped and scraped the rest back into the Vaseline container.
Before I moved on to the next batch I used very hot water to rinse all my utensils and bowl. I made sure to dry them completely because I didn't want any water to interfere with the Vaseline. Then we repeated the process of melting the Vaseline. Once that was done I switched to the whisk and slowly poured the Koolaid in while stirring the whole time. I immediately poured them into the containers my daughter laid out for me again.
And there you have it...easy peasy! And what a wonderful little Treasure the girls will have come party night!!!
.JPG)


Jennifer, just wanted to stop by and tell you I love your blog! I am passing on to you the Versatile blogger award!
ReplyDeleteStop by my blog at http://mariaelenasdecor.blogspot.com/ so you can check out all the information. Congratulations!
Thank you, thank you...how exciting!!! I don't know if I even know that many blogs, and you passed it on to my sister at the same time. She's The Concrete Cottage...so I can't pass it to her. DANG! Oh, well, we love the recognition!!! Thank you again!
DeleteYour blog is great and you are just getting started?! Snaps to you!! Mary at merrydotdandy.com invited me and she is so nice (she is my sister, too). I love your ideas for lipgloss. That is tough to do, for me anyway. I am NOT a crafter. When it calls to make something I freak out. Hey, come visit me, too?
ReplyDeleteI might have to try these some time. Good idea for a girly birthday party. :)
ReplyDelete