C.A.S.E.
Copy And Steal Everything
Years ago when I was scrapbooking (does anyone even do that any more?) I heard of this term. I loved it!!! I scrapbooked with a group of girls once a month and I was an avid reader of Creating Keepsakes. I got inspiration from many, many other pages and I always adapted them just a bit to fit my style. I CASE-D everyone...unapologetically! So it stands to reason that when I discovered Pinterest I was a VERY QUICK addict. I've gotten so much inspiration from the Internet. Google images and I are great friends...and now there's a way to put it all in one spot??? I'm SOOO there!!!
Thing is...you can spend a ton of time on Pinterest looking and pinning great ideas, but until you put them to work it's not going to do a thing for you!!! That being said, I have this spot right next to my front door that needed...something. I saw shutters on Pinterest and thought "Yes, that's it!!! Umm...so what would I do with a shutter on the wall? Hmmm???" Then I thought "Oh, I'll see if I can find an old wood ladder and put hooks on it for kids coats!" and spent a TON of time looking for the perfect old ladder to no avail. This space is screaming for something NOW...and face it, I'm an impatient person...again, unapologetic about it!
So the other day I ran across this letter idea on Pinterest. It was from Karen's blog
Somewhat Quirky. She had a letter "H" that had an interesting design on it that caught my eye. I pinned it and went back later to check it out. It looked simple enough and she described it well enough to duplicate. I thought "I can do that!!! And...I could do it to the word 'Welcome' and put it in THAT spot!!!" So off to Hobby Lobby I went (and isn't it nice when they have the very item you need on sale that week 30% off!)
Pieces needed for this project:
~ Paper Mache letter(s)
~ Aleene's Tacky Glue
~ Aluminum Foil
~ Mod Podge
~ Shoe Polish (I used the waxy kind, don't know if another would have worked better...more explanation later)
~ Acrylic Paint (I used Americana Dark Chocolate)
~ Sponge Brush
~ Brush for paint
~ Soft Rag (this will get ruined so make it something disposable to you)
~ Xacto Knife
~ Damp Paper Towels (used toward the end)
Step One: Pick out some paper mache letters...Hobby Lobby's the only place who carries them here in our Okie town...then grab some
Aleene's Tacky Glue. As Karen says on her blog...Do NOT use Elmer's glue. It won't work for this. Aleene's is the way to go!!! Then plan on sitting down with a fairly steady hand and "glue" some swirls, curly cues, paisleys, polka dots, or stamp an image and glue over it. This is going to get covered so if you need to plan your pattern and draw it out feel free and don't worry about erasing!!! Gotta love that!
Once you glue your pattern on all the letter(s), let it dry till it's completely clear. I let it set over night before moving on to step two. Then give yourself plenty of time, cause this next step takes it all...that is if you're ambitious and crazy like me and decide to do 7 letters at once.
Step Two: Cut some strips of aluminum foil about a 1/2 inch wider than the edges of your letter(s). Mod Podge them to the edge overlapping to the front and back of the letter. Cover all the sides of the letter(s). I recommend with letters that have very sharp or deep turns (like the M and W) to start and stop the strips in the turn. It's nearly impossible to get the foil to bend in those without ripping it.
(Wow...it was sooo much faster typing that than it was to accomplish it!!! YAY for small victories!)

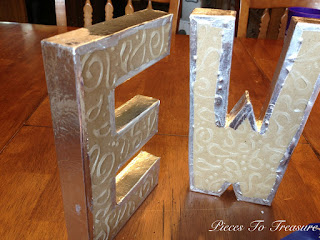

Step Three: Here's one place I differed with Karen on how to do this project. This worked for me so much better. Cut a piece of aluminum foil large enough to cover the letter with a little extra. Mod Podge the entire letter making sure to cover every swirl and dot of glue. Lay the aluminum foil over the letter but not tightly...I'll explain in a sec. Take the soft cloth and start rubbing the letter to adhere the foil and bring out all the lovely pattern you glued so meticulously. If the foil isn't very tight to the letter, but has just a bit of give it makes it easier to shape the foil around the patterns. This is easier to understand once you do it. Once you've fully attached the foil and brought out all the shapes, take the Xacto knife and cut around the letter. I didn't cut right exactly along the edge, but close and used my cloth to push the foil down and attach it to the letter. There was usually enough glue along the edge that I didn't have to add any. The glue doesn't come out of the rag, but keep it because you can use it with the shoe polish...then toss it in the trash cause it won't be good for anything else after that!!!. Let them dry well!


 |
| All the Pieces and Parts to this point |
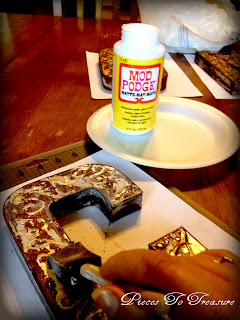
Step Four: Here's where I left the reservation completely (at least that's the saying here in Okie land for ignoring the instructions completely for doing it our own way). I started with brown Kiwi shoe polish wax and rubbed that onto the front of the letter. It wasn't turning out the way I wanted. It changed the tint of the aluminum foil, but not dark enough for my liking. So, I ran to my craft closet and grabbed the first brown acrylic paint I saw and a brush. I painted the front and sides of the first letter with a thin coat of the paint. Then I took a damp paper towel and began wiping it back. It seemed like quite a bit of the paint came off so i decided to put a thicker layer of paint on the next letter. Once the paint was dry I then used my cloth to apply the shoe polish again. This time it stayed a bit better and gave my paint a deeper, richer look. For the next letter I did the thicker paint then wiped it back with the damp paper towel. I was happier with the effect. I also tried painting several letters before rubbing off paint. The paint stuck better...somewhat...but would come off in larger pieces. Either method worked and like sanding back a piece...it's all based on how little or much you work it. I waxed the rest of the letters with the shoe polish then let them dry for a little bit. Once they were dry I painted Mod Podge over the front and the sides of the letter, then let that dry completely.


Step Five: Now that my letters were finished I had to decide how to hang them. Paper Mache letters aren't heavy at all so Velcro would work well. 3M makes wonderful stuff that allows you to take the Velcro off the wall easily if you want to change things around, but I needed a lot of pieces and that can be a bit pricey. Stickum might work well, but it might not. I don't want to walk around the corner to find them on the floor. So I chose Velcro...just sticky Velcro. I don't want to move them, so I made a trip to my Michael's and found a 75 count package of Velcro for around $10. Luckily I had a 50% off coupon so it cost me less than $6!!! (Yay for coupons!!!) I chose small round pieces of Velcro and attached them to each prominent corner.


Final Step: I measured each letter length and width and decided how much space I wanted between each. I added that all up and measured the area I wanted to place them. I could have been very precise and halved it and all that, but it's right next to a door way and so I just chose to make the top even with the top of the door moulding and left it at that. Using my determined measurements I attached them all to the wall then stepped back, took more pictures, then enjoyed my new Treasure!!!
So here are my CASE-D letters...in all their glory...inspiration from Karen at
Somewhat Quirky, redesigned and modified by yours truly!!! And now that space driving me crazy is filled and my mind is ready for another project to pester me till I get to it!!!
I'm Linked Up!!!
Sunday
Monday
Tuesday

.JPG)
.JPG)
.JPG)
.JPG)
.JPG)
.JPG)
.JPG)
.JPG)
.JPG)
.JPG)
.JPG)
.JPG)
.JPG)
.JPG)
.JPG)
.JPG)
.JPG)
.JPG)
.JPG)
.JPG)
.JPG)
.JPG)
.JPG)
.JPG)
.JPG)
.JPG)
.JPG)
.JPG)


